
"Unless someone like you cares a whole awful lot, nothing is going to get better. It's not." --Dr. Seuss, The Lorax
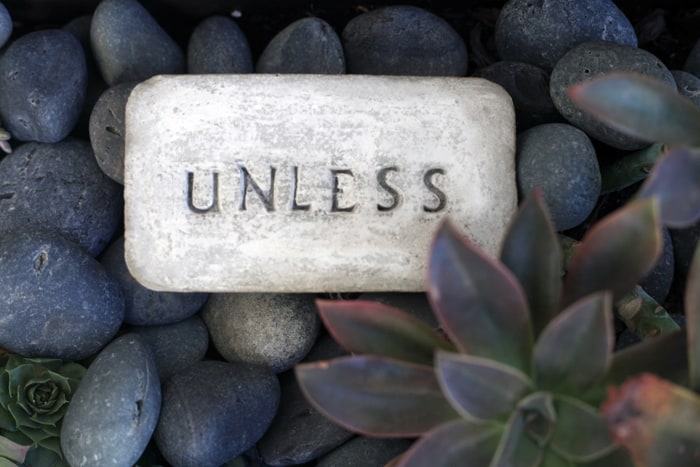
Are you ready to Get Creative with The Lorax? When we were asked to come up with a DIY project in support of Universal Pictures’ DR. SEUSS’ THE LORAX we had no shortage of ideas. This story is filled with fun characters, beautiful imagery and a powerful environmental message. At the end of the story the Lorax leaves you with a single word carved in stone.UNLESS. Since it’s time to get green in the garden, at least in Texas & California, we are here to show you how to make an UNLESS garden stone. Of course you don’t have to do UNLESS but Lorax fans will love the inside reference. Doesn’t every garden need a little Seuss? And if a littleSeuss isn’t enough for you, be sure to catch The Lorax in theaters on March 2.

It’s time to make an UNLESS Garden Stone. Are you ready?
Pick up some cement. Since I didn’t want a giant bag, this little 10lb box from Michael’s was perfect or have some delivered to your door.


Add one cup water. Just enough to moisten all of the cement. No more.

Stir until no cement is left dry.

Prepare your mold. If you are using something inflexible like these mini loaf pans, coat them with oil or Pam. If you are using a flexible plastic mold or milk carton or such, you shouldn’t need to do so.

Add cement to pans and smooth top. Tap mold on hard surface to level and release trapped air, if possible.

If you are going to add tiles to your stone, now is the time to do so.

If you are just going to do the stamped “engraved” letters, set a timer for 30 minutes.

Maybe use this time to clean your tools. Clean cement outside so you don’t destroy your plumbing.

If you want your stone to look like ours, pick up these Stepping Stone Stamps . They are about $7 at Micheal’s and online.

Take a peek at your cement. If water is accumulating on top, dab it dry with a paper towel.

At about 30 minutes, scratch the surface with a toothpick, if it makes a “dry” mark, you are ready. If not, wait about 10-15 more minutes. I did one stone at 30 minutes and one at 40 minutes and the 40 minute stone held its letter shapes better.
Stamp your letters. You can make small lines to use as guides, to stamp on a straight line or to find your center. Start with the center letters and work your way out to the edge.

Am I a nerd for thinking this is awesome? yes.
·
·
keep stamping. If you mess up, you should be able to smooth out the surface and restamp. At 30 minutes, I was able to do so.

LOVE! But see how the little piece of the “E” broke?

Try to fix that with a toothpick.

Worked pretty well!

Now smooth any unwanted marks or guidelines with a clean dry fingertip.

And that’s it! Let it dry undisturbed for 24 hours.
But now you have all that cement, why not make more?

Are you excited about cement? How about The Lorax? If you want more Lorax, follow The Lorax on Facebook.
No comments:
Post a Comment